Roll Your Own DNS-Based CDN
Websites are accessed in more areas around the globe today than ever before. For the most part this is good news all around, but with this growth comes a number of challenges — one of these being the latency and unreliability in accessing servers from geographically distant locations.
Introduction
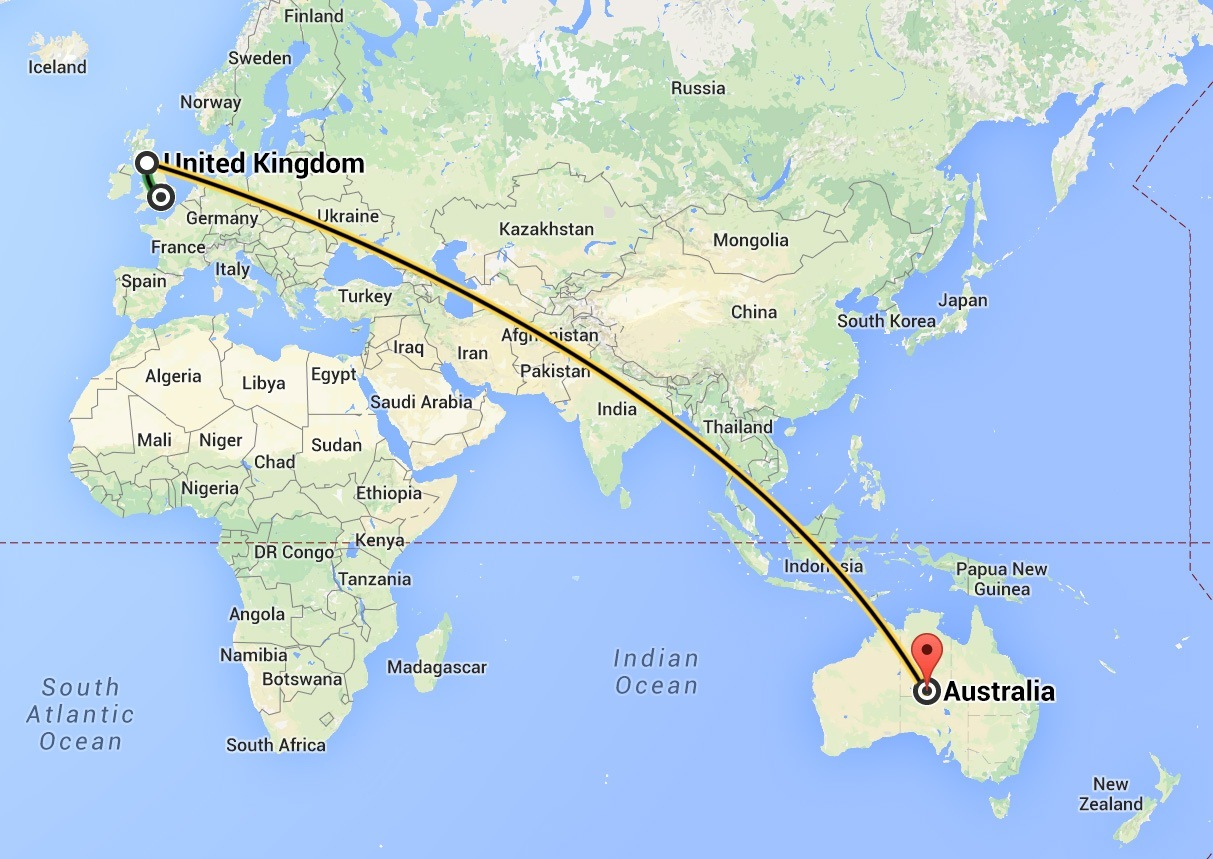
Running the ping utility from my consumer-grade UK broadband internet connection against the server that hosts the Australian Department of Health website yields an average of around 370ms round trip latency. As a result, the 44 HTTP requests on their homepage take my browser over 12s to finish loading. Perhaps this is just about acceptable in this case given that their target audience is likely Australian, but it's hardly ideal, and this type of situation only gets worse if we start talking about servers that serve realtime content.
A solution to this latency problem for big global websites — providing things are elsewhere properly optimised (like reducing HTTP requests from 44, *cough*) — is often to use globally distributed CDNs. These generally provide low latency high capacity infrastructures that serve files from the closest CDN server to the user. You may have heard of some of the big players that offer these services such as Akamai and Amazon Cloudfront.
This means that instead of sending 44 HTTP requests all the way to Australia, I might be able to send them to a server right here in the UK — a path over 15,000 kilometres shorter, offering a more reliable connection with a great deal less latency.
So if I wanted to set up my own video sharing website, for example, it would almost certainly be worth my time serving video content from a CDN of sorts so that users around the world can stream video content without getting eternally frustrating at the streaming speed. Of course, a CDN isn't the silver bullet in such a situation — there are a great deal of infrastructural issues that need addressing if you're looking to serve video at scale — but a CDN is certainly a step in the right direction.
So I'll just go out and exchange some funds with Akamai, Amazon, MaxCDN, or Cloudflare, right? Well, maybe. For a lot of projects that need to globally scale, those guys offer fantastic solutions. They're the professionals at doing this stuff after all. For other projects, however, these CDNs are too expensive, don't provide some level of required flexibility, or are just downright overkill. In these cases, why not set up your own smaller-scale CDN? Plus, it'll be fun.
The Theory
Different CDNs work in different ways — these each have their own merits, but in this article I'm going to focus on setting up the global distribution mechanism via DNS. The thinking here is as follows: the user pops open their web browser of choice and navigates to a URL referring to a resource you want globally distributed. In order to make the request, their web browser needs to resolve the requested domain name into an IP address of a server to query.
Their browser sends the DNS request to perform this resolution to the nameserver that the user is configured with — often the ISP's DNS server — and assuming the result of the query isn't in the nameserver's cache, the request may bounce through a few other nameservers until it finally reaches our custom-configured nameserver, which returns the IP of the geographically closest server to the requesting entity's IP address. Simple!
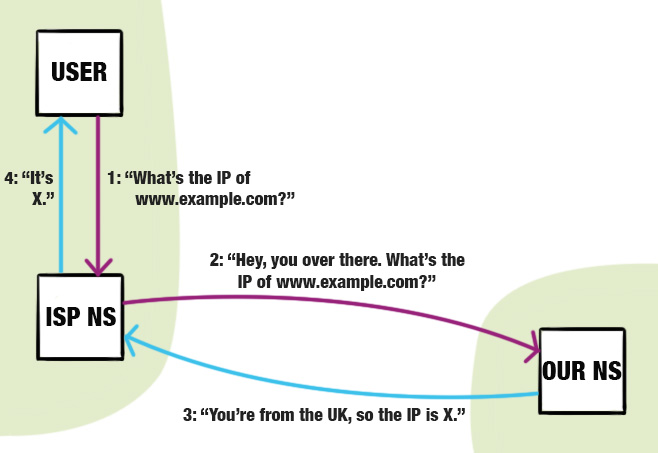
Note the assumption here that the user's location and the location of the requesting DNS server are the same. This is often the case, but not always. If the user is using Google's DNS servers, for example, their DNS request will be routed through one of Google's physical nameservers, which may or may not reside in the same country as the user.
In terms of the software we want to use here, there are a few options, but I've chosen to use the PowerDNS software with the Geo backend for location-based routing. This setup is actually what The Wikimedia Foundation uses for their DNS as a form of load balancing and to "reduce response times for clients".
Getting It Working
With all that chit-chat out of the way, let's actually get some nameservers set up. You can go ahead and purchase a couple of VPSes from your favourite VPS supplier — Linode and DigitalOcean are my personal favourites (the smallest DO droplets are good for this) — and get them set up with some sensible default configurations (e.g. secure SSH access). If you install a firewall, be sure to allow traffic through port 53.
On the chance that you don't already own some servers to do the heavy lifting of actually serving the CDN data, you'll probably want to purchase and configure a few of those too (I recommend installing Varnish).
I'm going to be running through these instructions with Ubuntu Server 14.04 LTS, but many of the steps will be applicable to other Linux distributions... probably. In a production environment it'd make sense to configure some replication between a number of nameservers, but for this article I'm just going to step through a single, manual, standalone configuration.
First off, let's install the software that we've already established we'll need, PowerDNS and the Geo backend: sudo apt-get install pdns-server pdns-backend-geo.
After installation you can go into the PowerDNS directory (which is /etc/powerdns on my machine), and configure all your regular DNS stuff: your SOA record, NS records, A/AAAA records, any MX records, etc. For the sake of simplicity here, I'll do this through the BIND zone backend. If you aren't familiar with the BIND zone file format, it's fairly standard.
/etc/powerdns/bindbackend.conf: zone "example.com" {
type master;
file "/etc/powerdns/bind/example.com.zone";
allow-update { none; };
};
/etc/powerdns/bind/example.com.zone: $ORIGIN example.com. ; base for unqualified names
$TTL 86400 ; default record time-to-live
@ IN SOA ns1.example.com. hostmaster.example.com. 2014073100 86400 7200 3600000 172800
@ NS ns1.example.com.
@ NS ns2.example.com.
ns1 A your-ns1-ip
ns2 A your-ns2-ip
; ...
Importantly, note the presence of the NS records which indicate the authoritative nameservers for this zone, and the A records which can resolve these nameserver addresses. You'll want to specify NS and A records for all the custom-configured nameservers that you plan to set up (and remember, it's important to have more than one in case your only nameserver falls over and dies).
Next, we need to think about configuring the Geo backend. The majority of this should be straightforward, however since the backend can only apply to a single zone at a time and has to manage all the DNS properties of this zone, some thought should be put towards how we want to manage the zones and records such that they work together properly.
My solution to this is to use CNAME records to circumvent the single zone limitation. If you aren't familiar, CNAME records can essentially be read as "this thing resolves to the same IP as that thing". So we can have a single zone dedicated to the Geo backend — geo.example.com — and if we want to geographically balance www.example.com, we create a CNAME record from the 'www' subdomain to the 'geo' subdomain. The Geo backend will then do its magic and will return another CNAME record, this one being to the record representing the server closest to a certain region — but more on that in a minute.
To start off the configuration let's head over to the /etc/powerdns/pdns.d directory (which is included into the main configuration file by default), and create a new file for our location-based routing config. I'm going to call mine pdns.geo.conf. Here we can configure our Geo backend, geo.example.com, zone:
# Add the geo backend to the list of backends to launch
launch+=geo

# The zone we want geo-balanced
geo-zone=geo.example.com

# The SOA values for this zone.
# The only parts of the SOA that apply here are the primary nameserver
# and the contact address (as there's no AXFR).
geo-soa-values=ns1.example.com,hostmaster@example.com

# List of NS records of the PowerDNS servers that are authoritative for
# this zone.
geo-ns-records=ns1.example.com,ns2.example.com

# The TTL of the CNAME records that geobackend will return.  Since the same
# resolver will always get the same CNAME (apart from if the director-map
# changes) it is safe to return a reasonable TTL, so if you leave this
# commented then a sane default will be chosen.
# geo-ttl=300

# The TTL of the NS records that will be returned.  Leave this commented if
# you don't understand.
# geo-ns-ttl=86400

# IP/prefixlen -> ISO-country-code mappings
geo-ip-map-zonefile=/etc/powerdns/countries/zz.countries.nerd.dk.rbldnsd

# The map files that say which record to answer for and what actual
# resource record to return for each ISO country code.
# ISO-country-code -> Region mappings
geo-maps=/etc/powerdns/geo-maps
For the most part these settings should be reasonably straightforward to follow. The last two — as commented in the snippet — are essentially just files used by the Geo backend to figure out which IP's refer to which country codes, and then which country codes should refer to which region-specific server records.
So let's go ahead and provide both of these mappings. Andreas Plesner Jacobsen over at Nerd.dk has created an IP to ISO country code mapping that I use — 'zz.countries.nerd.dk.rbldnsd' —, but I can't find a reputable link to it anywhere. I have no idea how up-to-date the version I have is, but I've uploaded it as a GitHub Gist that you can get here.
You can download the IP to ISO country code mapping file you want to use (e.g. via wget) to the location we specified in our config file, /etc/powerdns/countries/zz.countries.nerd.dk.rbldnsd. Next up, we need to specify some region to resource record mappings. We want to specify the mappings for the geo.example.com zone, so can create the file /etc/powerdns/geo-maps/geo.example.com.
In this file we should firstly set the $RECORD and $ORIGIN values. $RECORD dictates the resource that this mapping is for, and $ORIGIN — like in the BIND zone file format — specifies a base address for unqualified names. Thus we can set $RECORD to geo.example.com. and $ORIGIN to example.com. so we can have geo.example.com redirect to something like eu.example.com simply with the isoCountryNumber -> eu country to resource mapping.
The data in the file proceeding this really depends on what servers you actually want users from different countries to use. Essentially what follows is just a series of country code numbers followed by record names, in which the country code 0 is the default if there are no other matches. It makes sense to use a script of some sorts to dynamically generate this mapping depending on your specific needs — I've prepared a JavaScript object here for your potential usage, the data for which came from here.
If you decide to create a script that can generate this file for you, this also opens up some possibilities for adding health checks and load stress data into your generation algorithms. Every five minutes, for example, you could re-generate the map and then run pdns_control rediscover to get the Geo backend to refresh its data. Keep in mind you'd probably want to lower the geo-ttl setting in this case, especially if you're using something like health checks to provide DNS-level failover. I'm not sure whether doing this is necessarily a good idea, but it's an interesting route of thought at least.
Back to the configuration though, for the sakes of this article let's just say we wanted an extremely simple mapping: we want users from the United States to use the US server, represented by the us.example.com record, and everyone else to use the EU server, represented by the eu.example.com record. Thus our /etc/powerdns/geo-maps/geo.example.com file will be as follows:
$RECORD geo.example.com.
$ORIGIN example.com.
0 eu
840 us
Great! Now we should let our nameserver know which IP addresses eu.example.com and us.example.com actually relate to, which we can do by simply adding some some bits to our zone file (/etc/powerdns/bind/example.com.zone):
eu		A		eu-server-ipv4-address
us		A		us-server-ipv4-address
For IPv6 support, you could add some AAAA records here too.
We should also add some CNAME records for whatever subdomains we actually want to use the location-based routing functionality for such that they hit our geo.example.com zone, as discussed earlier:
www		CNAME	geo
cdn		CNAME	geo
Following this, we're pretty much finished with the important stuff. Keep in mind that using CNAME in this way can often create opportunities for duplicate content (users might, for example, go to 'eu.example.com' direct in their web browser rather than going to 'www.example.com', which we don't want), so you may wish to ensure your server is redirecting requests as appropriate.
As a closing step before we switch this baby on, a few final pieces of configuration modification may be necessary. On my default install, the /etc/powerdns/pdns.d/pdns.simplebind.conf file contains a launch statement which may override the one we specified in our geo config file. Modify the line launch=bind, if present, to launch+=bind so that the configurations can play together nicely. The usage of launch+= everywhere will also require a base property to add to, so you should open up /etc/powerdns/pdns.conf and uncomment or add the line launch=.
And that's it, we're finally done! Run sudo service pdns restart to restart PowerDNS, and then you can try to use dig or host on your local machine, sending the request to any one of your specially configured cluster of nameservers, to see if you get the response you expect. dig www.example.com @nameserver-ip-address or host www.example.com nameserver-ip-address should work great. In true "You have a problem? Try throwing some VPSes at it." style, I fired up some boxes in different regions to test this configuration, and it works!
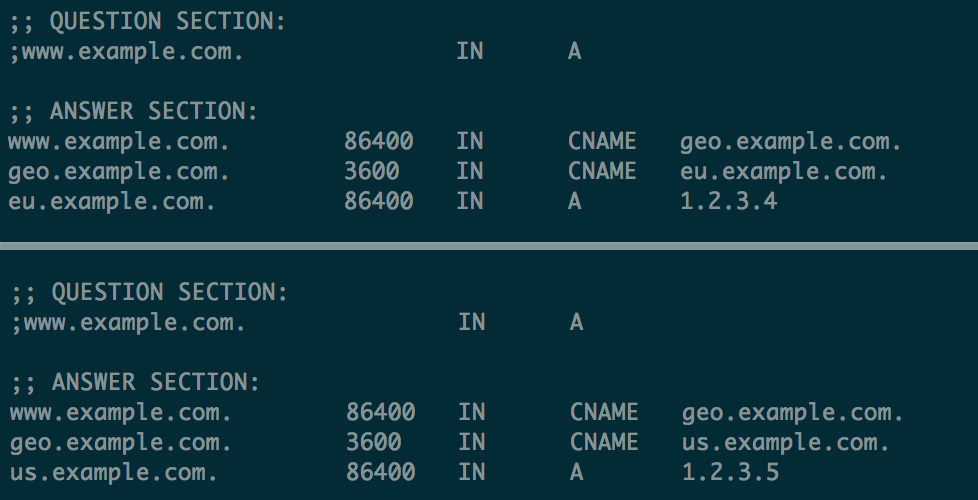
dig output from european and american machines. Huzzah — it works!With all of this set up successfully, pushing the system into production would be relatively easy — you'd just need to set up some glue records so that your nameservers resolve correctly and then just point your domain to your custom nameservers. There you have it, your very own small-scale low-budget custom CDN!